Hi Guys, I've now moved my blog to http://www.mackolicious.com/blog please follow that link to see my latest posts
Wednesday, 14 August 2013
Productivity Power Tools 2012
There are many features which come with Productivity Power Tools 2012 (aka free mini resharper), however one of my favourite features is the new solution wide Remove and Sort.
Remove and Sort is a feature I use constantly on a per class level to remove unwanted using directives and sort them by System first.
Now this can be achieved by right clicking on the solution and then selecting -> remove and sort
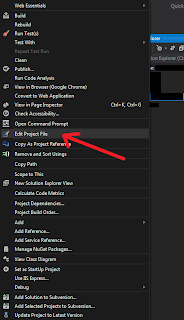
Another cool feature is the new Edit Project File as opposed to unload -> edit project file. Quite a minor feature but still worth a mention.
Thursday, 18 July 2013
Deploying with Visual Studio 2012 (and Visual Studio 2010)
Publish Profiles
The key to this publish dilemma is Publish Profiles, Using these will change your life forever.
Step 1. - Creating a Publish Profile
These can be created manually but the easiest way is to use the publish wizard in Visual Studio 2012.
Right click on the project you want published and select publish.
You will need to actually publish the project in order for the Publish Profile to be created (that sucks!). Once you've published whether it worked or not there should be a publish profile saved in the properties folder underneath the published project:
Check that in to your source control so that is can be available on the build server.
Step 2. - Automating the deployment
Ok, so now you have to prepare the command line arguments to run against msbuild. The following should be sufficient:
msbuild.exe
/p:publishUrl=LOCATION_OF_WHERE_YOU_WANT_YOUR_STUFF_DEPLOYED
/p:DeployOnBuild=true /p:PublishProfile=NAME_OF_PUBLISH_PROFILE.pubxml
/p:Configuration=Release
//the configuration property can be a custom configuration in order to apply web.config transformations
Notes
The publish profile can be created manually if you are using Visual Studio 2010; as long as the publish profile file is saved in the correct location all should be good.I have tested this against web applications that publish vis FTP and it works fine!
References
- http://sedodream.com/2010/04/26/ConfigTransformationsOutsideOfWebAppBuilds.aspx
- http://www.hanselman.com/blog/TinyHappyFeatures3PublishingImprovementsChainedConfigTransformsAndDeployingASPNETAppsFromTheCommandLine.aspx
- http://sedodream.com/2012/10/27/MSBuildHowToSetTheConfigurationProperty.aspx
- http://sedodream.com/2012/08/19/VisualStudioProjectCompatabilityAndVisualStudioVersion.aspx
- http://stackoverflow.com/questions/13920146/using-msbuild-exe-to-publish-a-asp-net-mvc-4-project-with-the-cmd-line
- http://msdn.microsoft.com/en-us/library/dd465326(VS.100).aspx
- http://www.hanselman.com/blog/SlowCheetahWebconfigTransformationSyntaxNowGeneralizedForAnyXMLConfigurationFile.aspx
- http://stackoverflow.com/questions/8366091/how-do-i-use-web-config-transform-on-my-connection-strings
Tuesday, 28 May 2013
JQuery Brazilian Portuguese DatePicker
One such plugin is the JQuery localisation feature which allows you to customise the datepicker depending on the local, i.e. the Country and/or Language.
Firstly you need to include the modified JQuery datepicker javascript file with the following name: jquery.ui.datepicker-xx-XX.js, where 'xx-XX' represents the specific culture, e.g. jquery.ui.datepicker-pt-BR.js.
Then inside that jquery.ui.datepicker-pt-BR.js file you need to insert your culture specific translations, Brazilian Portuguese is below:
jQuery(function ($) {
  $.datepicker.regional['pt-BR'] = {
  closeText: 'Fechar',
  prevText: 'Anter',
  nextText: 'Próx',
  currentText: 'Hoje',
  monthNames: ['Janeiro', 'Fevereiro', 'Março', 'Abril', 'Maio', 'Junho',
  'Julho', 'Agosto', 'Setembro', 'Outubro', 'Novembro', 'Dezembro'],
  monthNamesShort: ['Jan', 'Fev', 'Mar', 'Abr', 'Mai', 'Jun','Jul', 'Ago', 'Set', 'Out', 'Nov', 'Dez'],
  dayNames: ['Domingo', 'Segunda', 'Terça', 'Quarta', 'Quinta', 'Sexta', 'Sábado'],
  dayNamesShort: ['Dom', 'Seg', 'Ter', 'Qua', 'Qui', 'Sex', 'Sáb'],
  dayNamesMin: ['D', 'S', 'T', 'Q', 'Q', 'S', 'S'],
  weekHeader: 'Sem',
  dateFormat: 'dd/mm/yy',
  firstDay: 0,
  isRTL: false,
  showMonthAfterYear: false,
  yearSuffix: ''
 };
});
And reference that file in your script tags:<script src="/Scripts/jquery.ui.datepicker-pt-BR.js" ></script>
Use the following code to attach the localised datepicker to a text box.
<input type="text" name="DateOfBirth" id="DateOfBirth"/>

<script>
  $(function () {
        var culture = 'pt-BR';
        $.datepicker.setDefaults( $.datepicker.regional[ culture ] );
        $("#DateOfBirth").datepicker({
             dateFormat: 'dd/mm/yy',
             yearRange: '1920:2013',
             maxDate: '+0M +0D',
             changeMonth: true,
             changeYear: true
        });
});
</script>
Saturday, 16 February 2013
Working with OAuth 2.0

OAuth 2.0 is a protocol (set of rules) which allows you to access a user's personal information without having to know their user credentials, i.e. username or password.
This is quite significant considering all of the issues surrounding security with user authentication, e.g. SSL, certificates, storage encryption etc.
What this means is you could access a person's Gmail account given just their permission.

[Screen shot taken from https://developers.google.com/oauthplayground/]
There are various processes involved in the OAuth 2.0 protocol, but the most common is the Authorisation Code Grant Flow.
The Authorisation Code Grant Flow allows a program to gain access to a user's personal information by access of a authorisation token.
The process works as follows:
1. The program/application requests an authorisation token from their chosen provider along with what they want to access, e.g. the program might say, "can i please have an authorisation token Google for Billy's Gmail account?"
2. Billy then has to approved that request by simply saying "yes" or "no".
3. Assuming Billy said "yes" then the program/application is issued with an authorisation token from the provider
(Google).
4. The program/application can then exchange this for an access token which is actually what is needed to access Billy's Gmail account. With that token the program/application can then read Billy's Gmail account.
The access token expires about every hour so the program/application will need to make sure that they request a new one!
Here is a link to the OAuth 2.0 Java library I wrote, which should explain the process in a bit more detail :)


